This article originally appeared in the May 2001 issue of the Dæmon News Online Magazine. This is a cleaned-up version of the article with minor style edits and made it HTML5 compliant; else, the content has not been changed.
Did you ever wish that there was an easier way to configure and administer your BSD server? Well... other than whipping out your favorite editor and hack configuration files? How would you like to remotely manage a server without using [insecure] Telnet or SSH? There are several products that allow a sysadmin to configure a server via a web-browser. Some of the most flexible ones aren't available for free (like Plesk), although trial versions can be downloaded.
Webmin was created to provide a fairly simple, but powerful, way to administer a UNIX-like system. Since its first release in late 1997, it has always been freely available under the BSD license and has since been acquired by Caldera. Webmin is completely web-based and uses its own simple web server (which is written entirely in PERL 5 without any external modules). For people who need a little more security, you can setup Webmin to use SSL and HTTPS.
Not only does Webmin support a large number of UNIX-like operating systems (a list of supported OSs, as of version 0.84, can be found here), but through the use of modules, it can support many of the commonly used daemons and server software. Webmin includes quite a few modules with the standard install (including: Sendmail, BIND 4 and BIND 8, Apache, Postgres SQL, MySQL, NFS, and Samba). A list of all of the standard modules can be located here and a list of third-party modules is available here. Most modules available are licensed under the GNU Public License; the rest are either commercial-ware or licensed under the BSD License.
Downloading and installing Webmin is rather painless since you can either install it via Ports or by downloading the source code here. The system that I am using to install Webmin on is running FreeBSD 4.2-RELEASE; the Ports collection on the machine is sync'd up every night. If you are installing from Ports, you can either pull the Webmin port tar file from an FTP server or sync up the Ports collection to get the latest port.
To install Webmin from the local Ports collection, login to the machine, su to root, and run:
cd /usr/ports/sysutils/webmin; make && make install
To compile and install Webmin from source code, extract the .tar.gz, as root, and run:
cd /path/to/webmin/source/; setup.sh
During the installation, the setup script will prompt where you want the config files to be located, etc. Below is a quick snippet of the output from the install I did on my test machine. Text in italics are the values that I used for my install. In most cases, I would recommend you use the defaults for each of the options that come up during the setup.
The setup will ask you where you want Webmin to store the config and log files:
	Config file directory [/usr/local/etc/webmin]: [default]
	Log file directory [/var/log/webmin]: [default]
The setup will then ask where PERL 5 is installed and tests to see if it's working or not. If you get an error message, make sure that you are pointing to the right path, or that an earlier version of PERL is not installed:
	Full path to perl (default /usr/bin/perl): [default]

	Testing Perl ...
	Perl seems to be installed ok
Next, it will prompt for the operating system that you are running; so just select the correct one from the list that it gives you. Then it will bring up a list of different versions of the operating system you just chose.
The last portion covers how the standalone web server will be configured and the security of the web server. Here you can use the defaults or use anything to your liking. I decided to use port 902 instead of the default since it was one port up from the Samba SWAT port... makes it easier for me to remember.
	Web server port (default 10000): 902
	Login name (default admin): radmin
	Login password: not echoed
	Password again: not echoed
	Web server hostname (default bsdmirror): bsdmirror
	Use SSL (y/n): y
When finished, the installer script will generate the proper configuration files and make any changes necessary for Webmin to work. If you had chosen to use SSL with Webmin, the following warning will appear:
	Because Webmin uses SSL for encryption only, the certificate
	it uses is not signed by one of the recognized CAs such as
	Verisign. When you first connect to the Webmin server, your
	browser will ask you if you want to accept the certificate
	presented, as it does not recognize the CA. Say yes.
Make sure that you take note of that and do not use Webmin's certificate authority module to assign certificates for other use. Once everything is done, you can just open up a web browser and type in http://hostname:port (or https://hostname:port). Type in the username and password that you used in the install script to login and you will be greeted with the start page.
Warning: As with any administration tool, it is important that any and all critical configuration files are backed up on a regular basis and before you have any major changes. Webmin is no exception and with its ease of use, it is easy to take down a server with several mouse clicks.
Also, before you apply any changes, double-check what you have changed and make any notes about the changes in a log. This way, if something failed to work after the change was made, you can easily backtrack the steps that were taken to restore a daemon or the server.
And finally, if you are not sure about any settings that are presented, you can use the built-in help system or documents available from Webmin's site. Some of the third-party modules do not provide a lot of documentation, either bundled or from their site. Most module authors have a way to contact them or have mailing lists setup to ask for help.
The Webmin site is divided into five different sections: Webmin, System, Servers, Hardware and Others. Under each section, there are many modules that are pre-packaged with Webmin that allow you to start working immediately. Let's start off with configuring Webmin to your liking.
At the Webmin start page, browse to the Webmin section and click on Webmin Configuration. Here, you can limit access to Webmin to a group of IP addresses, configure which port Webmin runs on, tweak the user interface, etc. Let's say that you want to restrict access to Webmin so that only users on the 172.16.1.0 subnet can access Webmin. To do so, just click on IP Access Control, select Only allow from listed addresses and type in 172.16.1.0/255.255.255.0 into the field. Thankfully, you don't have to worry about converting a standard subnet mask into the number format (ie: 255.255.255.0 -> /24).
By default, each of the letters in the pages' title are GIF images... although this does help keep a consistent look-and-feel and it makes the page load a lot slower on dial-up connections. You can change that (and any other style options) under the User Interface module. Just switch Display titles as text? from No to Yes.
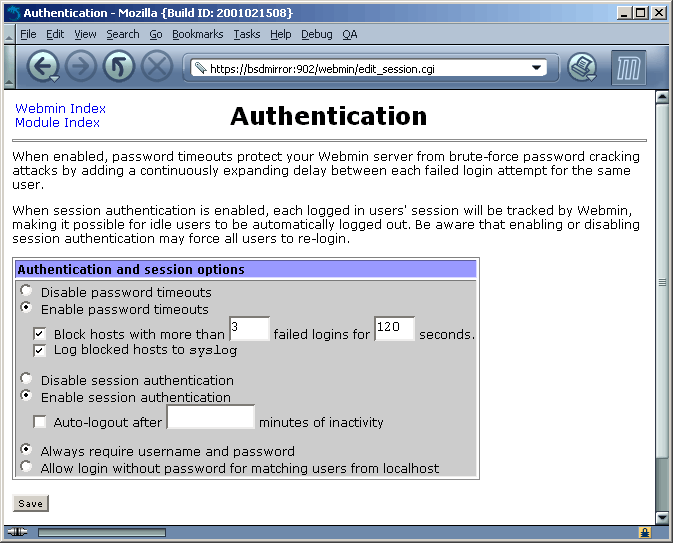
One other note is that you setup Webmin to use a form for login rather than the standard HTTP authentication method. Webmin calls this form of authentication "Session Authentication," which gives you the option to lock out a login after a determined number of failed attempts. It also gives you the option to set an idle time-out for each session. The authentication options can be set in Webmin / Webmin Configuration / Authentication. Below is an example of the authentication options:
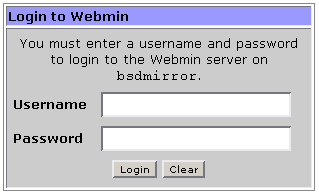
If you enabled Session Authentication, you will be presented with a form to log in to rather than the standard login dialog as shown below.
Before leaving the Webmin Configuration section, you will notice that you can update Webmin through a very simple web form (it will ask you if you want to update from a source package that you have downloaded already or pull it from Webmin's site directly), add/remove modules, and tweak with the SSL options. There is a also module for themes, but I haven't seen a lot of notes or documentation on how it works or where one can download themes.
I would like to quickly touch on Webmin's access list and how you can have different logins that are
restricted to a number of modules. Webmin normally uses its own password database for its users. This
way no one can try to hack the root account on that machine. In my example, the Webmin root
user is named radmin, and has full access to every module. It's not always a good idea to give
out the Webmin root username and password to users just so they can get into Webmin. You can create
accounts and set it so that only certain accounts can get to specific modules. For example, you can
have a user called dnsadmin that only has access to the BIND 8 module if that user is only
to maintain BIND 8 on that particular machine.
Each Webmin user can have a different password (which can be set to the local system's password if the Webmin username matches an account on the local system), a default language, different IP access control lists, etc. To setup Webmin users, go to Webmin / Webmin Users and choose Create a new Webmin user.
If you have several Webmin users that need to access the same modules, you can create a group that has those common modules enabled. This way you won't forget to enable modules for each individual user.
Once you have finished setting up and configuring Webmin, you can start using Webmin to maintain the system. The system maintenance modules are broken into four different groups: System, Servers, Hardware and Others.
The System group contains modules that you would use to maintain disk quotas, file systems, NFS exports, manage system users and groups, manage software packages and to look at individual system logs. You can even peek into each user's mailbox if you wanted to, but that the function to do so should be restricted to troubleshooting a user's mailbox (like deleting a message with a 100MB attachment); or if you are a BOFH, you can read the user's love letters that he/she might receive ;-).
The Servers group has modules that pertain mostly to daemons or any server software that may reside on that machine. The most common daemons are included with the Webmin package are Apache, Sendmail and Samba. Now you can venture into Sendmail configuration without having to read or write cryptic .cf files. One of the small quirks of the included modules is that some of the default settings don't correlate with the default BSD layout.
The Hardware group is fairly barren, but does allow you to configure your network
interfaces and printers. Even though setting up a printer or a print queue in BSD is relatively easy,
doing the same in Webmin is much easier. If gs, or GhostScript, is installed, you can use the
Webmin printer drivers to setup some of the most common printers that may not use Postscript or can be
a pain to find a print filter for. This is a huge thumbs up for Webmin.
The final group is named Other, which holds a couple of the most interesting modules available. Here, you can launch a Java applet that will allow you to cruise the file system or to Telnet into the machine, view a very high-level system status report, or even create your own custom command. A custom command allows you to run scripts or programs that output information back to the console, where Webmin captures it and spits it back out into HTML format.
Installing Webmin modules is very simple and can be done through three slightly different methods.
You will need to go to Webmin / Webmin Configuration / Webmin Modules to install the
modules. From here, you can install a module that you have already downloaded onto that machine or onto
the machine that you are accessing Webmin with, or from a URL. After click on Install Module
From File, it will pull down the file, if necessary, and install the .wbm file into
the Webmin modules directory and that's it. You can use the new module without having to restart Webmin.
As mentioned above, the default Webmin package includes a Java applet that allows a user to Telnet into the server. Using Telnet to get into a server is not only insecure, but doesn't make sense if you are using SSL/HTTPS to access Webmin. Thankfully, you can pull down a module that uses a MindTerm Java applet to SSH into the server. The module was created by Jamie Cameron and can be downloaded here.
Another nice module that isn't included by default is called "Backup System," which provides a quick way to backup and restore files without having to remember the tar options and syntax. It's definitely not a replacement for AMANDA or any other backup solution, but if you need a quick and simple solution, this will do the job. The module can be downloaded here; the module's website is here.
It is really nice to see a web-based remote administration tool that is not only user friendly, but it is also free and it uses the BSD license. Of course, it doesn't go away without any quirks of its own. As I mentioned previously, some of the modules don't work after being installed. Also, the default FTP module is geared towards WU-FTP rather than the default FTP daemon found in most BSD-based servers. Unfortunately, there aren't that many modules for FTP daemons other than one for the default OpenBSD FTP daemon.
Also missing is a page that shows how many users are logged into the Webmin server at any given moment. This may not be a problem for some people, but it does cause a problem where one needs to see who is doing what. The Webmin Actions Log doesn't show much detail either. I haven't stopped using Webmin or cursed at Webmin because of this, but I know this is on the plate for the Webmin developers.
My last gripe is more on performance on slower systems. Since Webmin is written with PERL and extensively uses CGI programs, it can soak up a lot of processor cycles and memory on any machine with an x86-based processor running at speeds <200Mhz and has less than 32MB of memory. If the system is already strapped for resources, you may want to upgrade the memory in the system before using Webmin.
UNIX purists will probably cringe at the idea of not using a text editor to hack away at a server's configuration. For the rest of the community, Webmin does provide a nice, extensible and unique way of managing a server without having to trying to decipher configuration files. The product is definitely not perfect, but the product will continue to improve at a very fast pace as it reaches version 1.0.
For people who are just starting to learn UNIX systems administration, this might make UNIX less intimidating and easier to learn. It definitely does not replace hacking configuration files completely, but it reduces the complexity by a lot.
Webmin's project website is located at http://www.webmin.com/webmin.
Article copyright © 2001–2010 Linh Pham. All rights reserved. Re-production of portions of this work, or its entirety, requires permission of the copyright holder.